Sending an SMS message to a group of your business contacts (clients or friends) doesn’t have to be complicated. Here is a simple step by step guide on how you can go about it. And the best part is, your team can collaborate with you as well.
Step 1.
Establish a shared spreadsheet
This is the spreadsheet in which your team can work. We have made this Collaborative sheet for you, which you can just copy. Here is the explanation of the columns (also explained in the spreadsheet):
- *Name: Name of the Contact
- *Email: Email address of the contact
- *Phone: Phone number of the contact
- *Tags: This is a keyword tag you use to control which contact gets which template of SMS (if you are sending multiple types of messages to same group of people). This field is auto populated when you add data in Tag 1, Tag 2 and Tag 3 columns.
- Any other fields you wish to add to SMS template, can also be defined in there. Just rename the field in the column header and add its values below
- Send to Zapier: This is your final PUSH button. Write anything in this field, would invoke SMS chat with that contact.
*fields are compulsory.
Please note: All mobile phone numbers collected for your contacts outside of the United States must follow E.164 number formatting. This formatting is an internationally-recognized standard phone number format and includes the following:
- A “+” sign
- International Country Calling code
- Local Area code
- Local phone number
For example, if you have a contact located in Australia, you would format their phone number to be:
+61 123 456 789
Step 2:
Connect with Zapier
Now that you have the data ready to publish, its time to sync it with an SMS chatbot.
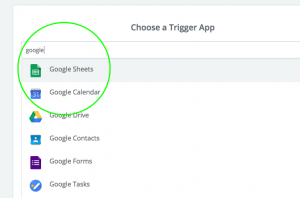
- Make a Zap on Zapier
- Choose Google Spreadsheet

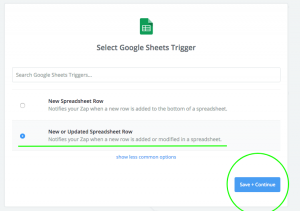
- Choose ‘New Row or Row Updated’
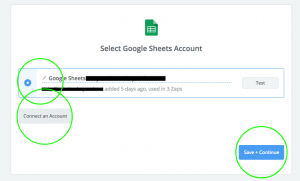
- Choose Google Account to connect to
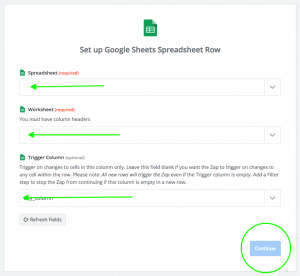
- Choose Spreadsheet, Sheet and Trigger column (Send to Zapier)
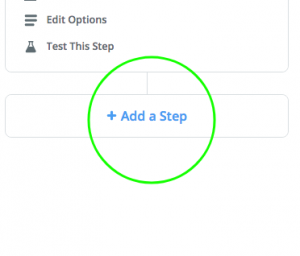
- Add a Step
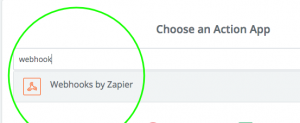
- Choose Webhook by Zapier
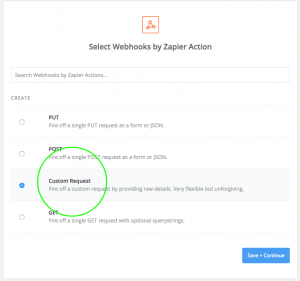
- Choose Custom Post
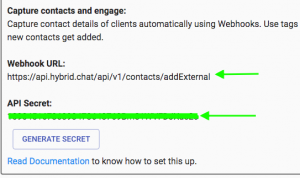
- Copy API URL and Secret key from your Hybrid.Chat Contact Manager page and post it in Webhook URL field
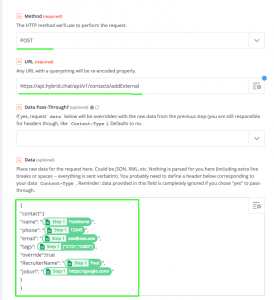
- Configure Data payload. It may look something like this:
{
“contact”:{
“name”: “{{52090646__COL$A}}”,
“phone”: “{{52090646__COL$C}}”,
“email”: “{{52090646__COL$B}}”,
“tags”: {{52090646__COL$D}},
“Field 1”: “{{52090646__COL$J}}”,
“Field 2”: “{{52090646__COL$I}}”
}
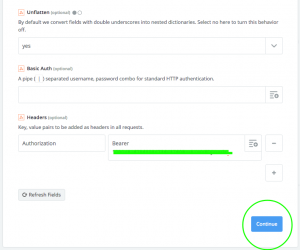
} - In headers, write Authorization and in value Bearer
- Click Continue. This should make Zapier test the Webhook. It everything is fine, it should say OK
Now you have established a continuous sync from Google Spreadsheet to Hybrid.Chat Contact Manager. Any changes you make in the spreadsheet, are pushed into it. Use Tags and Triggers to initiate a chatbot. Now, your team can start editing the spreadsheet above, and when you are happy with it, just update ‘Send to Zapier’ Column to trigger the bots. 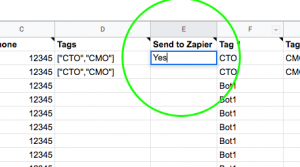
Building a Chatbot is easy and can automate a lot of stuff for you. You can use this chatbot to send one time Festive greetings, Following candidates on recruitment, Tender Food orders, Followup with customers for a glowing Yelp review and much more. The possibilities are unlimited.
We can help you set this bot for you, shall you want. Feel free to drop us a message and we will be happy to help.